Photoshop

Creating a perspective image in Photoshop generally means just using the Transform>Perspective tool. The results are generally fairly decent, but if you're a user of Photoshop CS4 Extended you can get better results.

Convert your image (or the portion you wish to add perspective to) into its own layer. Select that layer and go to the 3D Menu and choose New 3D Postcard From Layer.

Now use the 3D Rotate and 3D Orbit tools in the lower portion of the Photoshop Tools to adjust your image. The tools take a little getting used to, but a little playing around will give you a pretty good idea of how to manipulate your image.

ps_3D-perspective.jpg

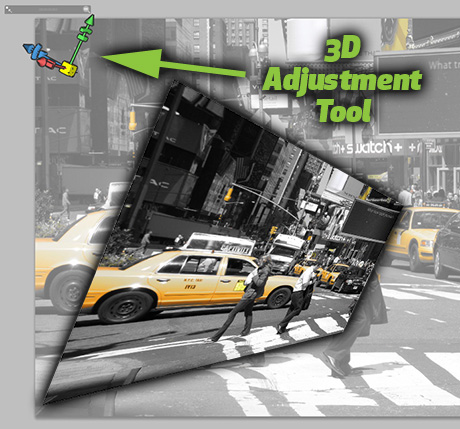
Using the tools will place a 3D adjustment tool in the upper left corner of your image as seen in the image above. Grab portions of the tool and drag them around to see your image get manipulated. It takes a little tinkering, but I think you'll find you have much more control over adding persective.

BlackBerry layered Photoshop file

I recently had the need to use a nice clean image of a smartphone. I began searching through the numerous images found via Google and eventually came across this freely available layered Photoshop file of a BlackBerry - just what I was looking for from a user over at DeviantArt.

res_blackberry-psd-file.jpg

The 6.2 MB download expands to a 15 MB PSD image containing, well, a ton of layers - allowing you to customize the heck out of it.

Working with Document Tabs in Adobe CS4 Apps

With the release of the Adobe Creative Suite 4, all the major apps have adopted a tabbed document interface. At first it's a bit difficult to get used to, but I've found it to be a pretty decent productivity increase. The one thing that baffled me was how difficult it was to get objects from one document to another. I of course am not one for reading manuals, so it took me a while to figure out how simple it really is.

You can drag objects (or entire layers for that matter) from one document to another when they're both open simply by selecting the object(s) or layer(s) from one document and dragging them to the tab of the second document and hovering them over the tab for a brief second. The second document moves to the front and you can let go of them to place them.

Enhance your Photoshop History panel

PhotoshopAdobe Photoshop's History panel is probably one of the most useful tools in Photoshop, allowing you to undo and redo things you've already done to your image with the click of a button. Many users, however, don't take advantage of the flexibility that the History panel offers.

Hanging punctuation in Adobe Photoshop

ps_hang-punctuation.pngIf you've spent any amount of time setting type in Adobe InDesign, you've no-doubt turned on hanging punctuation via the Story panel — at least, you should have it on.

Hanging punctuation floats quote marks, bullet points, periods, commas and other punctuation just outside the text container to make justified type look better.

For those times when InDesign isn't the primary app for doing your design work in (such as Web and multi-media graphics work), Adobe Photoshop also offers hanging punctuation capability. You can turn it on by visiting the Paragraph panel's fly-out menu and choosing Roman Hanging Punctuation.

Large blocks of type (particularly when justified) will look much cleaner when turning on this option!

Free sticky tape brushes & textures

Photoshop Brushes are an easy way to spice up your designs. Grab them, place them and you’re done.

Fudgegraphics has a collection of sticky tape brushes and textures to enhance your latest Photoshop design.

Sticky Tape Photoshop Brushes

The Brush collection is a single, 25.3MB file, containing 15 brushes averaging over 2,000 pixels in size.

The Texture collection is a 39MB ZIP file containing 15 PNG files of the same images as the brush set.

You can download Sticky Tape absolutely free from Fudgegraphics.

"Blow Up" your images in style

ps_BlowUp.jpgEnlarging photos appears to be a simple and mundane task for the average user. But as a pro, you understand the ramifications of firing up Photoshop and just using the Image Size dialog box, or worse yet, just stretching an image in your page layout application.

Blow Up 2, from Alien Skin Software, is a Photoshop plugin that produces high-quality image enlargements by using an algorithm which temporarily converts pixels in your photo to vectors. The results are a sharper, more detailed enlargement.

Read my full review of Blow Up 2 at Macworld. Blow Up 2 isn't for everyone, but if you do a lot of image enlargements from low resolution or small high resolution images, Alien Skin has a pretty good solution with Blow Up.

Create new documents from Photoshop layers

When you have a multi-layered Photoshop document and for whatever reason you want to save each layer as a separate document, it's quite easy to do - and requires no tedious cut & paste commands.

Layers to documents in Photoshop

Go to File>Scripts>Export Layers to Files. When the dialog box appears, you'll have several options available including where you want to save the files, and a file name prefix. You can also choose from a number of file formats to save the document as, including JPG, PSD, PDF, TIF and more. Each format offers a few options as well.

Alien Skin Bokeh plugin review

Macworld recently published my review of Alien Skin Software's Bokeh plugin for Adobe Photoshop, Fireworks and Elements.

Tilt-Shift photography effect using Bokeh plugin

Part 1 of the review can be found here, and covers the bokeh effect to emphasize your subject by adding blur to the background and adjusting the highlights of your image.

Part 2 of the article can be found here, and covers the ability to use the Bokeh plugin to simulate tilt-shift photography, which effectively allows you to turn your image into a miniature model as seen in the image above.

If you don't have the budget for expensive tilt-shift and bokeh lenses, this plugin might be just what the digital doctor ordered to enhance your images.

Reverting to old-style window interface in Photoshop CS4

Document tabs preference

If you're a long-time Mac user and don't care for Adobe Photoshop CS4's new Tabbed document interface, you can revert back to the old-style single image windows by going to Photoshop>Preferences>Interface and unchecking the Open Documents as Tabs button in the Panels & Document section.