Rather than using your mouse to invoke Photoshop's color/patter Fill dialog box, you can use the quick keyboard shortcut, which is Shift + Delete.
Photoshop
Shortcut to Photoshop's Fill dialog box
Submitted by James on Wed, 12/30/2009 - 06:3211 ways to Zoom in Photoshop CS4
Submitted by James on Wed, 11/18/2009 - 05:07 Did you know you can quickly and temporarily switch to the Zoom tool in Photoshop CS4 simply by hitting the Z key? How about by hitting Command + Spacebar? Command + or Command - works pretty well too.
Adobe offers a plethora of ways to use the tools available in Photoshop, and my friends at CreativeTechs have posted 11 ways to Zoom in Photoshop CS4 to prove the point.
Some of these options I was unaware of, or simply had forgotten about. Some are more cumbersome for me than they're worth. But the fact that there are so many ways to accomplish such a simple task is impressive, if you ask me.
Be sure to check out all the other great tips available at CreativeTechs - it's a great resource for users of Adobe's Creative Suite apps!
Free Smoke brushes for Photoshop users
Submitted by James on Fri, 11/13/2009 - 09:44A while back I told you about some free smoke textures you could download and use in your Photoshop designs. But if those textures didn't quite fit your needs, perhaps you would be better off creating your own texture backgrounds.

QBrushes has an awesome set of 21 free smoke brushes for use in Photoshop. Using them on top of color backgrounds and messing with the layer settings can yield some pretty cool results!
Using Adobe Photoshop's Note tool to save time and confusion
Submitted by James on Wed, 10/28/2009 - 04:52![]() One little known and used feature in Adobe's Photoshop application is the Note tool. For years I made notes in a text file and sent it along with the layered Photoshop file to clients and other designers to explain certain aspects of the file in question. It was a pain not only to create a second file, but required me to explain the part of the file I was referring to clearly enough for the other person to figure out.
One little known and used feature in Adobe's Photoshop application is the Note tool. For years I made notes in a text file and sent it along with the layered Photoshop file to clients and other designers to explain certain aspects of the file in question. It was a pain not only to create a second file, but required me to explain the part of the file I was referring to clearly enough for the other person to figure out.
![]() Adobe's Note tool solves both problems. You can find the Note tool hidden under the Eyedropper tool in the Tools panel/bar.
Adobe's Note tool solves both problems. You can find the Note tool hidden under the Eyedropper tool in the Tools panel/bar.
Once you select the tool, you simply click the cursor anywhere in the file you would like to place a Note. The Note panel opens and you're presented with an area to type any notes you wish to share with someone else you send the file to.
This can even be helpful to remind yourself later on what settings you may have used to achieve an effect, etc. I can't tell you how many times I've wished I wrote down the settings for a filter I used in an image.

The one thing you must remember is to save the file as a layered Photoshop file (.PSD), TIFF (.TIF), or Photoshop PDF (.PDF) and click the Notes checkbox in the Save As dialog box as seen above.
The Note feature is also available in Adobe InDesign, with the added benefit of the file automatically including the Notes when saved.
Adobe shows off possible Photoshop CS5 features
Submitted by James on Fri, 10/16/2009 - 04:47These Photoshop features found in an Adobe Labs video look just absolutely sick, and I can't wait for CS5 to be released - which is rumored to be around April of 2010.
Understanding ink limits in Photoshop
Submitted by James on Tue, 10/13/2009 - 07:00
Ink Limit is the amount of Ink of each color you put on the paper when printing. If your color in a document is 100% Cyan, 100% Magenta, 100% Yellow and 100% Black - you have a 400% ink limit (sometimes called density). Understanding and adjusting your ink limits can improve the quality of your printed piece.
MOST commercial printers like to have between 280%-300% ink limit. That means that if you want a nice deep black, you can run something like 60% cyan, 60% magenta, 40% yellow and 100% black - which is a 260% ink limit (or density). Using a higher ink limit, such as a CMYK setting of 100% of all four colors, will generally result in a muddy image, or wrinkled paper. At the very least, you may experience ink offset and extended dry times on your print job. Read on for more on ink limits.
Adobe releases Photoshop for iPhone, iPod Touch users
Submitted by James on Fri, 10/09/2009 - 18:51Adobe has released Photoshop.com Mobile for iPhone application, allowing users a convenient way to edit photos, apply effects and share images in - all with the flick of a finger.
Integration with Adobe's free Photoshop.com accounts enables photo sharing and data back-up, saving valuable space on your iPhone or iPod Touch.
Photoshop.com Mobile for iPhone provides users a simple way to view photos with full-screen previews and edit images with gesture-based editing. You can transform your photos with basic editing tools like crop, rotate and flip; as well as adjust color with saturation and tint tools, enhance exposure and vibrancy and convert images to black and white.

The app also offers eye-catching special effects. The Sketch tool helps photos look like drawings, and Soft Focus can give photos a subtle blur for artistic effect. With a single click, you can also apply dramatic changes to the look and feel of your photos with effects such as Warm Vintage, Vignette and Pop. Edits or changes can be undone or redone so you can experiment without the worry of losing the original photo.
The Adobe Photoshop.com Mobile for iPhone application is available as a free download from Apple's App Store on iPhone and iPod touch, or by clicking here. The application is available in the U.S. and Canada only.
While you're certainly not going to use an iPhone for anything remotely resembling heavy-duty image editing, it's nice to see Adobe recognize a market, and move quickly to fill the need. Quite frankly, I'm kind of surprised Apple didn't build-in more of these types of features.
The only thing that irks me about this is that iPod Touch users don't have the benefit of having a camera to really take advantage of the features Adobe offers with this app.
Creating better perspective transformations in Photoshop Extended
Submitted by James on Tue, 09/15/2009 - 04:47Creating a perspective image in Photoshop generally means just using the Transform>Perspective tool. The results are generally fairly decent, but if you're a user of Photoshop CS4 Extended you can get better results.
Convert your image (or the portion you wish to add perspective to) into its own layer. Select that layer and go to the 3D Menu and choose New 3D Postcard From Layer.
Now use the 3D Rotate and 3D Orbit tools in the lower portion of the Photoshop Tools to adjust your image. The tools take a little getting used to, but a little playing around will give you a pretty good idea of how to manipulate your image.
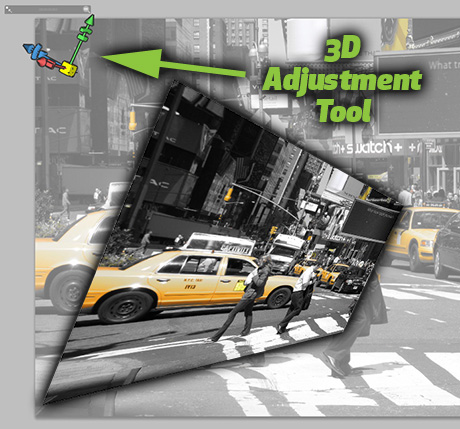
Using the tools will place a 3D adjustment tool in the upper left corner of your image as seen in the image above. Grab portions of the tool and drag them around to see your image get manipulated. It takes a little tinkering, but I think you'll find you have much more control over adding persective.
BlackBerry layered Photoshop file
Submitted by James on Mon, 09/14/2009 - 08:30I recently had the need to use a nice clean image of a smartphone. I began searching through the numerous images found via Google and eventually came across this freely available layered Photoshop file of a BlackBerry - just what I was looking for from a user over at DeviantArt.

The 6.2 MB download expands to a 15 MB PSD image containing, well, a ton of layers - allowing you to customize the heck out of it.
Working with Document Tabs in Adobe CS4 Apps
Submitted by James on Wed, 09/09/2009 - 06:29With the release of the Adobe Creative Suite 4, all the major apps have adopted a tabbed document interface. At first it's a bit difficult to get used to, but I've found it to be a pretty decent productivity increase. The one thing that baffled me was how difficult it was to get objects from one document to another. I of course am not one for reading manuals, so it took me a while to figure out how simple it really is.
You can drag objects (or entire layers for that matter) from one document to another when they're both open simply by selecting the object(s) or layer(s) from one document and dragging them to the tab of the second document and hovering them over the tab for a brief second. The second document moves to the front and you can let go of them to place them.