Adobe offers temporary fix for InDesign crashing bug on…
If you just bought a new Retina MacBook Pro or MacBook Air and you’re experiencing crashes in Adobe InDesign, here’s a temporary fix until Apple & Adobe completely fix the issue.
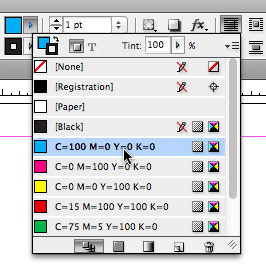
One unfortunate fact of using Adobe InDesign is the plethora of panels that most designers have to keep open and accessible at all times in order to be productive. It doesn’t leave a lot of space to view your document.
Fortunately, InDesign CS5‘s Control panel includes a full version of the color Swatches panel, so you can save yourself some screen real estate by using it instead of keeping the Swatches panel open on the screen at all times. The bonus of using the Swatches panel this way is that it scoots out of the way automatically when you’re done applying a color swatch to a fill or stroke to your object or text. You also have access to the Swatches panel fly-out menu.
My wife has been in need of a new laptop for a while now. Typically she’s delighted to get my old hand-me-downs when I upgrade. But this time around, she wanted something a little newer.
My one year old 13″ MacBook Pro was churning along just fine, so I wasn’t really thinking about upgrades for myself when she finally had enough and told me to get my butt to the Apple Store. She doesn’t need a powerful laptop, just plenty of storage for her music, photos and videos. I had a tough decision to make, because I’ve already been eye-balling a new 27″ iMac to replace my six year old MacPro sitting beneath my desk. I didn’t want to spend too much, but I do need a capable laptop for working on the go.
After reading a few forum discussions, playing with the demo units at the Apple Store, and three days of inner termoil, I decided to toss caution to the wind. I went with the 13″ MacBook Air, with the 1.7 GHz Core i5 processor, stock 4 GB of RAM, and the 128 GB SSD storage drive. My only question remaining to be answered was how would the Adobe Creative Suite perform on this lower-spec laptop? Read more “Adobe Creative Suite 5 running on a MacBook Air: Is it for you?” →
Adobe has announced the next version of their Creative Suite software. CS5.5 is heavily focused on designers wishing to take their work to tablet, smartphone, and EPUB users. All versions of their individual apps will be updated (except Acrobat, which remains at version X), as will the Creative Suites that comprise the apps – including InDesign, Photoshop, Illustrator, Dreamweaver, and Flash.
Beyond the numerous features for building interactive documents for use on iPad, iPhone, and other tablets and smartphones, there’s not much information available covering feature updates for print-based designers.
An Adobe CS5.5 pricing chart is available to help you decide what versions of the Suites or individual apps you wish to purchase.
This is where it gets interesting. Adobe has also announced a new month-by-month subscription plan for all their major Creative Suites and individual applications. For instance, you can rent Dreamweaver for as little as $19 per month, or the entire Creative Suite Web Premium for $89 per month. Serious Creative Suite users will most likely still want to purchase their preferred Suites, but for those who just need to complete a quick website and only own Design Standard can rent Dreamweaver for the price of a week’s worth of coffee at Starbucks.
With any Adobe Creative Suite update comes discussion of frequency and cost of updates. Adobe is making changes in this area. From now on, the Creative Suite will be on a 24-month development cycle for major upgrades (CS3, CS4, CS5, CS6, etc.). Every 12 months they will also release a mid-cycle update (such as the CS5.5 just announced) which will offer only minor feature enhancements, bug fixes, and code tweaking. Previously, Adobe released Creative Suite upgrades around every 18 months.
Unless you’re doing a lot of work destined for a tablet, smartphone or ebook reader, you’re probably going to skip this release and wait for Creative Suite 6. But if you do that type of work, CS5.5 appears to be a dandy update.
When you think of 3D applications, you rarely think of Adobe Illustrator CS5, but the fact is that Illustrator has some decent tools to create simple 3D vector art. VectorTuts has a great Illustrator 3D tutorial to introduce you to the tools and help you create some neat effects like you see in the image above.
One of the little features Adobe added to InDesign CS5 is something that’s been in Photoshop for a long time, and just makes rotating objects a little easier.
Rather than selecting your object and using the Rotate tool in the Tools panel, simply move your cursor to just outside the corner of your object with the Selection tool to reveal the hidden rotate icon – then just click and drag the mouse to rotate.
Of course if you’re looking for a keyboard shortcut, you can always just hit the R key to select the Rotate tool without visiting the Tools panel.
Either way, you can rotate multiple objects without grouping them – yet another time saver!
I have no set criteria for deciding what stays and what goes, but for the most part the app has to serve a particular need, look good, and work as advertised. The following is not a complete list of what’s installed on my Mac, but it represents what applications and utilities have stood the test of time, and what I use the most.
There are lots of note-taking apps out there, but when I set out to find one that was dead simple, had a Mac and web client, and synced with my iPhone – I found only one that worked for me. JustNotes uses the SimpleNote service and syncs with all my Macs, my iPhone. It offers a menubar item for quick access, a few keyboard shortcuts, and not much more. It’s exactly what I was looking for, and it’s free.
Note: SimpleNote offers a web client, as well as iPhone app by itself – so you only need JustNotes (or other compatible app) if you want a Mac client.
Read more “30 Mac OS X apps and utilities I love: Part 1” →
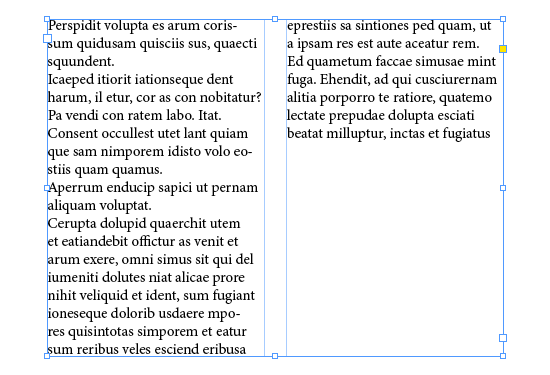
One of the cool new features found in Adobe InDesign CS5 is the ability to balance the amount of text appearing in multiple columns.
Take the image above for example. Rather than inserting hard returns, using the Enter key to force text to the next column, or adjusting the size of the text container itself, you can simply use the Balance Columns feature. To do so, select the text container to make it active, then go to Object>Text Frame Options… (or hit Command + B). In the dialog box that appears, tick the Balance Columns checkbox. The results are a balanced columns of text, regardless of the text container size as seen in the image below.
The beauty of this feature is that you can add more text later and the text columns will always adjust to stay balanced, as opposed to having to go back manually and remove hard returns or re-adjust the size of the text container.
Bokeh 2 gives photographers and designers a wide range of tools to focus attention where they want it. The focus region is easily placed over the subject and then the fun begins. Every aspect of the lens blur can be customized, from highlight intensity and shape to motion blur and vignette.
Bokeh 2 now works in Lightroom, including batch processing. The 64-bit version of Photoshop CS5 works great with Bokeh on both platforms. Bokeh provides multiple techniques for non-destructive editing in Photoshop, including Smart Filter support and rendering effects on a duplicate of the original layer.
Bokeh 2 sells for $199. Owners of Bokeh 1 may upgrade for $99. Online or physical delivery is available through the Alien Skin website. Free upgrades will be automatically sent to purchasers of Bokeh 1 who purchased in April 2010 or later.
Bokeh 2 is a plug-in and requires one of the following host applications:
I’m a huge fan of Bokeh, and I plan on putting it through its paces and post a review as soon as I get my hands on it.
You may have noticed something new when selecting colors with the eyedropper tool in Photoshop CS5. It’s called the color sampling ring, and it shows you the previously chosen color, as well as the one you’re clicking on in a ring around your cursor. This can be particularly useful if you’re trying to compare colors.
However, if you simply don’t like the screen clutter you can turn it off. Just select the eyedropper tool and take a look up in the Control Panel at the top of the screen. You’ll see a checkbox for “Show Sampling Ring” which you can uncheck to make it go away forever.
There is no shortage of advice for users to improve the performance of Photoshop. RAM is always king, the more you have, the better off you are. But having it isn’t enough, you have to know how to manage it.
Here are a few things that have helped me improve performance in Photoshop CS5 (though they’ll most likely work just fine in versions CS3 and CS4 as well).
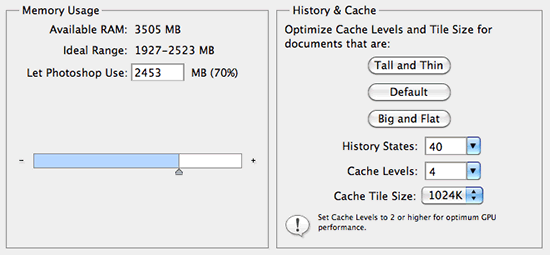
Go into Photoshop’s preferences (Command + K) and select the Performance item from the source list on the left. The first thing to adjust is the Memory Usage. I generally keep the RAM set between 60-70% with the slider. This allows me to use a good amount of my RAM for Photoshop, but still leave enough for other apps and the System itself. However, if you have less than 4GB of RAM, you should probably stick to 50% max. Your mileage may vary.
The next thing to adjust is your History & Cache settings. You can use the preset buttons (hover over them for a brief description of which you should use). Only my laptop, I use the settings you see in the screenshot above. Because I tend to use my laptop for web or other low-resolution work, the settings have worked superbly.
If you’re running Photoshop CS5 Extended, you can also check the 3D preferences and up the VRAM (video RAM) use to the max amount. I don’t do any 3D work, so I can’t tell you how well this works or not, but I keep it set to the max anyway.
If you work with a lot of layers in your Photoshop document, you can reduce the size of the individual icon layer thumbnails. The smaller the icon, the less memory Photoshop needs to redraw those thumbnails every time you make a change to a layer. Just make a quick trip to the Layers panel flyout menu and choose the Panel Options… menu item. You can also turn those layer thumbnails off completely if you’re really organized with layer naming.
There are numerous other tips that can help speed up Photoshop. Limiting the number of fonts installed and active is huge. You can also limit the number of files Photoshop remembers in the File menu list (adjust in the Photoshop preferences). Keep the layer count down as much as possible goes a long way, and not using Photoshop’s built-in Navigation panel with its giant thumbnail is a great idea as well.