If you enjoy Leopard’s new Mail Stationery for sending beautiful HTML email, but wished you could personalize it more, read on for some very good news!Apple has made Mail’s new Stationery feature quite easy to edit to your heart’s content, as long as you have an image editor that can save .jpg and .png files, and an HTML editor such as Dreamweaver (or just text edit if you’re a die-hard HTML coder). Just follow these simple steps:
Step 1:
Navigate to the root level of your Macintosh hard drive and go to: Library/Application Support/Apple/Mail/Stationery/ Apple/Contents/Resources

Inside this folder, you’ll see five more folders named the way you see them in Mail when you click the Stationery button in the upper right corner of new emails. They are Birthday, Announcements, Photos, Stationery, and Sentiments.
Step 2:
For the sake of keeping it easy in this tutorial, I chose to base my customized email off of one of Apple’s built-in templates called Sand Dollar Stationery.
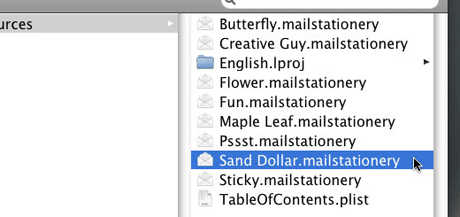
Go ahead and open the Stationery/Contents/Resources folder. You will see 8 files and a folder. Option-drag the Sand Dollar.mailstationery file to your desktop. We want to work on a copy of the file, not the original.
Step 3:
Control+Click (right-click) on the Sand Dollar.mailstationery file on your desktop and select Show Package Contents.
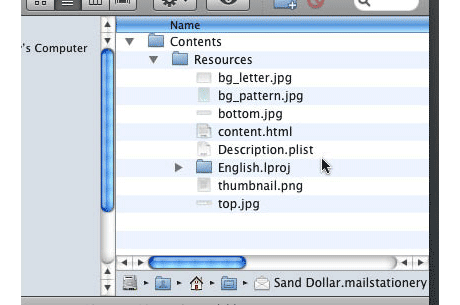
Another folder will open. Go ahead an open the Content/Resources folders until you see the basic files for the Stationery template. Here you will see seven files and a folder.
Step 4:
Open the content.html file just to get an idea of what the final template will look like. Once you’ve decided on your design, simply open each of the four .jpg files and customize them.
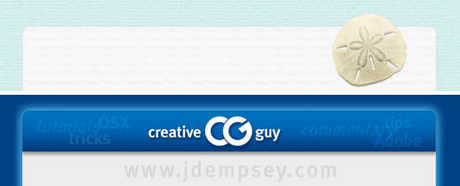
Obviously the file named top.jpg is the “masthead” of the template where you can place a logo, photo or whatever you wish. As you can see in the image above, I created a completely new “top.jpg” file to replace the Sand Dollar and paper background. Keep the background simple unless you really know what you’re doing. Be sure to save the .jpg files as the exact same file names.
Step 5:
Open the content.html file (if it’s not still open) to make sure your images have updated in the HTML. If you haven’t physically moved any of the files or changed the names, the HTML document should look perfect.At this point, you can also customize the “base text” that appears when you select the Stationery in Mail. Go ahead and add a signature at the bottom with your Web address or whatever you wish. For my purposes, I chose to just leave the text alone since I don’t send out emails with boilerplate text in them anyway.
Step 6:
Save and close the content.html file.At this point, I also dragged the content.html file to my Web browser and took a screenshot. I then opened the thumbnail.png file and pasted the screenshot into it and resized it to fit. Don’t forget to save the thumbnail image as a .png, not a .jpg file.
Step 7:
We’re just about finished. Open the Description.plist file in Text Edit. Make sure Text Edit is set to save files as plain-text, not rich-text. About 12 lines down you’ll see a “string” with the name of the template, in this case it’s Sand Dollar.mailstationery. Change it to whatever you want, keeping the .mailstationery part. Save and close the file.

Now go into the English.lproj folder and open the DisplayName.strings file in Text Edit. Change the name at the end of the text again from Sand Dollar inside the quotes to whatever you wish. Save and close the file.
Step 8:
Now close the folders and go back to your desktop and rename the Sand Dollar.mailstationery file to whatever you wish, keeping the extension. In my case, it was Creative Guy.mailstationery.
Step 9:
Drag the new package file from your desktop back into the original Stationery folder where you got it.
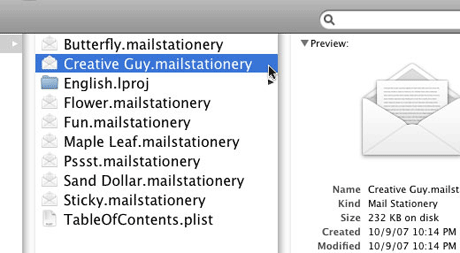
In my case it was:Library/Application Support/Apple/Mail/Stationery/ Apple/Contents/Resources/Stationery/Contents/Resources
Step 10:
Close all the folders and launch Mail. Create a new email, click the stationery button in the upper right corner of the window to display the list of available templates. Under the Stationery item in the list (or whichever one you chose to edit) you should see your new template icon (provided you did create that thumbnail.png image.To make it easy, I dragged my new template to the Favorites item in the list. As you can see by the final product below, it works perfectly.
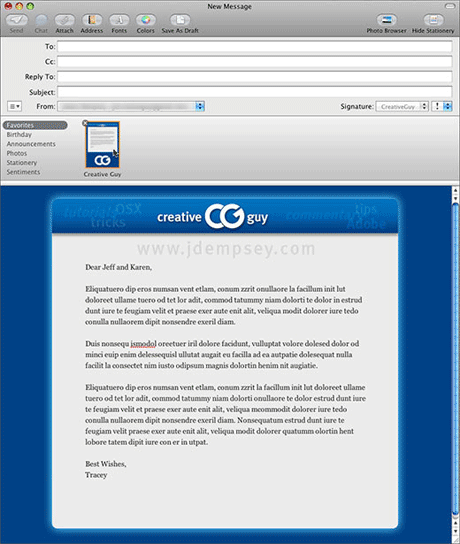
Obviously, the more you know about HTML, the more complicated you could make your customized templates. Though I haven’t tried, I suppose you could also include CSS.That’s it. Now select the text, type your email and send away!

I am going to repost my best efforts in case anyone gets to bottled up to read all the entries herein.
What I have done a few times is to crate a new message and then going to the “Format menu” I use the pulldown going to “Show Fonts” menu. when that has opened I select the font I want to use. After writing something-anything to make a place holder for font/typing to the 3rd selector box (one with the green/yellow background) and click on it. After that I choose a color from the color selector that pops up which colors the font itself. Then going back to the “Show Fonts” menu I select the 4th icon, the one with a blank page on it. This brings up the pop up that allows one to change the background colors. Select whatever color you want for the background color.
Then one can drag an image of their choosing if one needs something in there for whatever reason.
Then go to the “File” menu and choose “save as stationery”….That’s what I discovered works best for my Mac Mail. I am using version 4.2
I hope that this helps someone. This forum is what caused me to find out how to do at lest this in addition to the tutorial at the top of the page.
==========================================================================
I found this at the Apple Web site:
Apple Support Discussions and searched for
“Mail Stationery Templates” in the Mac OS X & Related Software Forum.
http://discussions.apple.com/thread.jspa?messageID=10634454�
===========================================================================
One can make a stationery and the go to file and save it as a Signature. Or one can create a signature saving it as a jpeg, then create a new signature in the Mail prefs. The one I just did for this comment is my number four. It was a jpeg and I saved it as stationery. After which I created a new email choosing the stationery that I had just made for the message. then I went to EDIT and selected all, copied it and then pasted it into the number four window in the right hand side.
Then drag the completed signature into however many email addresses you want it to be available. At the bottom of the Signature window in the prefs, which is the one that we have been working in, look at the bottom and notice that there is a pull-down that states “CHOOSE SIGNATURE:” just pull it down to choose which address you want it to always be put into.
Let me know how this goes for you. It works just fine in my iMac 2009 using Mac Mail v4.2 and OS 10.6.3
George I thought they worked great too! I think the only one that works in my folder now is the one I created following this.
The Apple Mail tech couldn’t figure it out with me either. So they have turned this over to the engineers at Apple.
I received a note about how old this thread is, but I guess it keeps going since many of us are new to 10.6.4. (apple actually replaced my 3 year old macbookpro because of a logic board issue–so now I have a ***free*** current macbookpro that’s screwing up my older 3rd party apps… but I am not complaining).
NOW if someone could only really teach me how to use this new track pad.
I found that the instructions provided at the top of the page worked exactly as intended, and I am using OS 10.6.4
Awesome, thank you for the help!
Thanks works a treat.
I too must chime in and say thank you. For those who do not believe in programs as this, you must not run a visual business–these will have a less chance of landing in a spam folder since they are from you and not a 3rd party provider.
I have created two; one from and Apple temp. and one from a Jumsoft. The Jumsoft, thus far is working fine, as are the others in the folder.
But the apple folder where I changed the one Stationery (thus just the templates in the Stationery folder) all are just showing a “jpg” icon instead of the actual image. There are not x’d links they are just the icons with the file names. I have tried going to the individual description plist and they are there. I followed everything else– has anyone else had this issue?
I am running mail 4.3, on a macbookPro running os 10.6.4.
Thanks tons.
Not sure when you wrote this article, but the instructions are not working for me using Mail.app version 4.3 (1081) in OS X 10.6.4 (Snow Leopard.) There is only a file called Favorites.plist in the directory at Library/Application Support/Apple/Mail/Stationery/ Apple/Contents/Resources. Additionally I could not even find a file on my hard drive called “sanddollar.mailstationery” or a folder called “sentiments”. Has apple changed things in this version of OS X or Mail to make it more difficult to work on stationery? Thanks for any help anyone can give.
I found this at the Apple Web site:
Apple Support Discussions and searched for
“Mail Stationery Templates” in the Mac OS X & Related Software Forum.
http://discussions.apple.com/thread.jspa?messageID=10634454�
Re: Mail Stationery Templates
Posted: Nov 24, 2009 10:40 AM in response to: Ronald Powell
Maybe not: is the icon still in your Toolbar?
If not, open a new message and then go to View/Customize Toolbar and drag it back.
I have Leopard 10.5.8 and do not seem to have the Stationary feature…I have looked in my new email window and nothing,,,,can you help me either download or find it? thanks
I can’t seem to change my Context.html file no matter what I do- anyone know?
I have tried saving it on my desktop and dragging it over, but the text still reverts back to the text thats in the template stationary..
THIS WAS AWESOME!!! Thank you!!! I have been searching for instructions like this for months! (It took me a little while to understand the linking of images, and the necessity of updating the images-name.xxx section in the Description.plist file… but, once I figured it out, it worked perfectly!!! Thank you so much!
I’m not sure about that. Is it something that you put on there when you made the stationery?
Hi,
I don’t think so…I don’t know where the heck it came from….
but thank you for the reply.
Love the stationary but in the upper right corner of the outgoing stationary there is a small leopard square…can I get rid of that?
Thanks
Tip:
Using stationary means that your emails get a LOT bigger: 150 Kb a piece is typical. While this may not seem to be prohibitive at first the emails add up quite quickly over time, consuming bandwidth and disk space, as the image components are always sent as attachments and are copied every time over and over again to your Sent folder.
If you have a web server (for instance the one included with MobileMe — me.com accounts) you can work around this. Just create a folder on your web server and upload the images in your stationary, typically in a root folder called img or something like that. Next you’ll have to fiddle a bit with your content.html document. Wherever there is an image reference, e.g.:
<td width=”740″ background=”bg_letter.jpg” class=”top-bg”>
you change that to a full web reference… e.g.:
<td width=”740″ background=”http://web.me.com/username/img/bg_letter.jpg” class=”top-bg”>
This way your emails stay small and do not consume bandwidth to the same degree and no disk space at all.
Thank you, Thank you, Thank you….
In my opinion, this is the most helpful guide for editing Mail templates that I was able to find!
Thank you
Nope doesn’t work. ;-(o
Or how about this then, a little less complicated.
James emailed me with the thought that maybe one can use HTML in these comment boxes so I will try it just to test it out. So if the comment winds up looking like the backside of a browser you’ll know it didn’t work. Uh, so will I. <<>>
a href=”http://www.flickr.com/photos/gholmes/4484914132/” title=”Screen shot 2010-04-02 at 1.35.09 PM by gholmes, on Flickr”>
the main problem of email templates is (I think ??) not all email programs can read the graphic features , is it possible to place somewhere a newsletter they can download or read with a browser, so you only have to put a link in your letter where the can find it ???????
It is easy if you have your own domain and web site. Just load up the newsletter (for instance) and then send out the specific URL for that one item. I have worked one up so that you can try it out using my own domain. Here is the URL for it:
http://www.photoartnet.com/gholmes/nltr.pdf
Is it possible do change a template with pictures as well ??????
Can you give me a different example? Do you mean an existing template or one that you have already created using the info in this thread?”
Hello, thanks for your reaction.
Yes I mean a existing email-template with Photo’s. Im trying to build a newsletter for my son in law, he is an artist (music) As a test I made a newsletter in Iweb with some
test- Photo’s in it ( a joke) see http://web.me.com/jankuijpers/sven/nieuwsbrief.html its in Dutch and German so I think you can’t read it but that’s not important. It must be possible to mail the newsletter and putting a file somewhere to dowload or watch for people that have problems reading the letter