Create a halftone-dot effect in Adobe Illustrator
A while back I posted a link that would show you how to create an interesting halftone-dot effect in Photoshop. Recently, a reader left a comment on the post asking if there was a way to achieve the same effect in Illustrator. I’m happy to report that there is, and I’ve put together a tutorial to show you how.  Step 1: Create a shape in Illustrator that you wish to convert into the halftone-dot effect. I chose a star. To achieve the mixed-size dots, you’ll want to use a gradient, and to make it easy later, you should probably start with a simple black color. Step 2: Select the object and select Effect>Pixelate>Color Halftone… from the menu. The color halftone dialog box will open where you can enter some numbers to adjust the appearance of the effect.
  Set the Max. Radius to 10-15 pixels. This will determine the size of the largest dot in the effect. Go ahead and leave the screen angles at the default setting. Hit OK. The star is now converted to a raster image. The darkest areas of the star have the largest dots, and the lightest areas have smaller dots. We are now half way there. We need to convert the raster image to vector. Step 3: With the star still selected, go to Object>Expand Appearance in the menu. Now select Object>Live Trace>Make and Expand from the menu. The star is now a full vector object. You can select each dot individually if you choose because they’re all vector shapes (see step 3 in the image above). But you probably want to add some color.
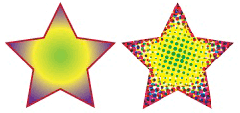
  Step 4: If the star is on a white background, everything will appear to be perfect. But draw a box, fill it with color and send it to the back by hitting Command-Shift-[. You’ll notice that the inside of the star remains white. If you want it to be transparent, you have just a bit more work to do. See the image at the right for an example of what I’m talking about. Use your Direct Select tool (the white arrow) to select any white are in the newly created halftone dot area. Go to Select>Same>Fill Color in the menu. Now that all the white areas are selected (including the white bounding box around the star, hit Delete. You should be left with nothing but the dots now. Now select the star again and add a color to it as you would any other object. Because the star is a compound path, all the dots will be colorized. That’s it. You have your halftone-dot effect, and it’s a fully-editable vector object in Illustrator. Why would you want to do it in Illustrator? Because many sign shops and screen printers require everything to be a vector shape depending on their production methods. Plus, it adds a little more flexibility for later editing.
  I chose to use a one color object for the sake of keeping this tutorial simple, but you can apply the same technique to a full color object for different results. See the image above with the same star filled with a color gradient.


4 COMMENTS
thanks, it’s really useful
i tried this in illustrator and the dots all ended up different colors. im not sure what went wrong. i followed all the directions creating a shape, then gradient, and color halftone, and when i did that the dots were overly large and different colors it didnt do anything close to yours.
The same thing happened to me. I changed the 4 “screen angles” options to “0” and it worked. Don’t ask me why.
Well… my english not it’s the better.. but I will try explain how to do this step:
1. go to effects> raster effects setting document.
1.2. color mode: grayscale
1.3. options: create clipping mask
1.4. ok
2. create your object and go to effects> Pixelate> Color Halftone
3. In the menu choose halftone color ratio (between 4-15)
3.1 Choosing just the screen angle of channel 1 (test that any angle)
4. If you see very large dots, this is because the object may be very small. Increase your size and you will see the correct effect.
Comments are closed.