There’s a quick way to center objects on your page without using the ruler and guides. First you need to select all the objects you want to center. Once you have them selected, Cut them (Command + X). Once you have them Cut to the clipboard, set your view to Fit in Window (Command + 0). And finally, Paste your objects (Command + V). All the objects should be centered on the page. One thing that will make this work as accurately as possible is to make sure that any frames which contain images or text are “trimmed” so that the boxes don’t have excess space to either side.
Easily center objects on the page in your InDesign document
Moving from Web design to print
It used to be that all things design started out in print. TV commercials, radio spots, outdoor boards and even Web sites started out with a print ad and were modified to fit other mediums. That time has long-since passed. Many Web site designers nowadays are finding that the market for Web work is rough going and extremely competitive. Factor in ever-changing technology, and you have thousands of Web and multimedia designers scrambling to supplement their income—or slide over to print design completely. So, if you’re a Web designer looking to add print to your stable of talents, you may want to take a look at this article I recently wrote for MacWorld.com, titled Moving from Web design to print. I also encourage you to register at the MacWorld site so you can post comments on the articles. The more interaction, the better the resource becomes.
Easily add vignettes to your Photoshop images
It’s a really old technique, and looks great when done properly. But adding Vignettes for some is overly complex. One of the easiest methods I’ve come across is this tip at LifeClever.  But I’m lazy, so I’ll go even further into the “easy” method. With Photoshop CS2, Adobe added a nifty little filter that does, among other things, vignettes. Here’s how it works: Make sure your image is in RGB mode. Select Filter>Distort>Lens Correction… There are several sections of this filter, but we’re going to use (obviously) the Vignette portion. First thing you may want to do is turn off the grid with the checkbox at the bottom of the dialog window. Slide the Amount slider under Vignette toward darken. This adds darkness around the edges and corners of your image. Now you adjust the amount of vignetting with the Midpoint slider. Move it to the right to have less of the image darkened or to the left to have more of the image darkened. That’s it. You can also apply the same technique to a layer filled with white above your image and set the layer effect to Multiply – this will allow you to adjust the darkness later if you wish.
Quickly place selective pages of a PDF into your InDesign document
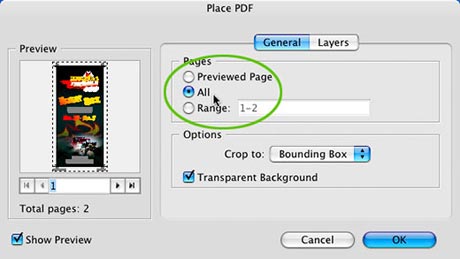
Did you know that you can place a multi-page PDF file in your InDesign document only using the Place command one time? Let’s say you want to place your two-page PDF file into your InDesign document. Start by hitting Command + D to place the file, navigate to the PDF you wish to place and select it. Then make sure you have the Show Import Options box checked. When you hit Open, the Options dialog box opens.  Click the All button in the Pages section (or select a page range if you only want a few pages from a long PDF file), and hit OK. Now when you go to place your file in your document, the cursor changes to a PDF icon with a plus mark. That plus mark indicates that there is more than one page to be placed. Simply click in your InDesign document where you want to place the PDF pages.
Saving your Illustrator files correctly
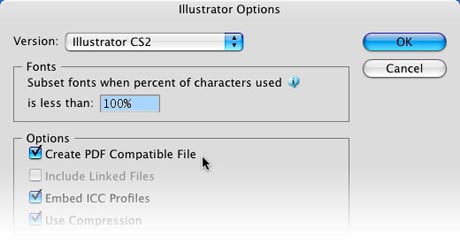
After installing the Adobe Creative Suite on a new MacPro and getting down to business on it, I noticed that a native Illustrator file (.ai) placed in my InDesign document was not displaying correctly. The first clue was that the transparency of the placed file wasn’t displaying at all in my InDesign document – that is to say, the artwork had a white bounding box around it. Fortunately, I remembered that I really hadn’t checked my Options in the Illustrator Save As dialog box when I saved the file.  If you’re experiencing the same issue, it’s easily fixed. When you save your Illustrator file as an .ai file, make sure you have the Create PDF Compatible File box checked.
Preparing your files for commercial printing
 For your average designer or production artist, preparing your files for printing is nothing more than selecting “collect for output” from a menu in your favorite layout application. But if you want to be more than average, you should get to know the pre-press & printing process and how you can make your jobs run more smoothly. Gregg Stalter at PhotoshopCafe has a lengthy article covering the entire printing process from terms used and selecting a printer, to prepress and finishing your job.
Using InDesign Object Styles
If you’re working on a book, manual or otherwise long document and you have a lot objects that you want to apply “styles” to (such as drop shadows, feather amount, borders, etc.), consider using Object Styles. Object Styles are similar to text style sheets in that they save the settings you apply to one object and place them in a palette for use on other objects. To use Object Styles, set up an object the way you want it to appear and go to the Options flyout menu of the Object Style palette. Select New Object Style, give it a name and click OK. Now that your style is set up, you can select several objects or one at a time and simply click on the Style in the list of the Object Style palette or assign a custom keyboard shortcut to apply the style.
Photoshop file formats for print designers
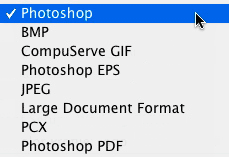
 Photoshop is primarily used by print designers for graphic imagery and generally isn’t the “final” format for any particular piece of work. Most designers with very little exception end up with the files in either InDesign, Illustrator or Quark XPress. But Photoshop has a lot of users in other industries including video, multi-media and photography. For this reason there are a lot of file format options available when you go to save your file. Below is a brief explanation of some of the formats you may use or come across as a print designer, along with some opinions about them that I’ve formed over the years: Photoshop (.psd) Photoshop’s native file format and can be read only by Photoshop, Preview and few select other applications. When saving your file in the .psd format, you retain all editability of fonts, layers and effects. If you wish to use the .psd format with other applications you can tick a preference to maximize file compatibility to save a “flattened” version of the layered file inside the file so it can be previewed by the other applications. With Quark XPress recently adding the ability to import layered Photoshop files, the .psd format is probably the only format you ever need to use for print design – since it includes spot channels, clipping paths, transparency, etc. It’s about the only format I use anymore when dealing with Photoshop images. Bitmap (.bmp) The Bitmap format is a Windows-based format and is generally restricted to flat black and white artwork, though it can contain color. Because of its limited use even on the Windows platform, I don’t recommend using it for any real work. EPS (.eps) EPS, which stands for Encapsulated PostScript, can contain both vector and bitmap information in the file, but is very different than Illustrator .eps formatted files. EPS format used to be the preferred format by designers when a clipping path was used to “cut out” the background of an image for use in Quark XPress. With the release of InDesign and the updates to Quark, this file format has really fallen by the wayside. If you are saving your files as EPS, I recommend you use 8-bit TIFF preview and Binary encoding for maximum compatibility with other platforms. JPEG (.jpg) This format probably needs little explanation. JPEG or JPG, which stands for Joint Photographic Experts Group, provides lossy compression to image files, thus making the image files much smaller than they actually were before compression. Most all standard applications (graphics and otherwise) can save or import the JPEG format, but it should be used with caution. Because JPEG is a lossy compression format, your images should be saved with the Image Options/Quality no less than 10 and the Format Options – left at Baseline (Standard) – anything less and you run the risk of image artifacts showing up. Large Document Format (.psb) Large document format is for saving huge files (300,000 pixels in any dimension) and can only be read by Photoshop CS and CS2. I can’t imagine the need for any print designer to use this format, but there probably is call to use it in the outdoor imaging markets. Photoshop PDF (.pdf) This is yet another way to save a PDF file which can include layers, alpha channels, spot colors and metadata, but gives you the flexibility of everything that the PDF format offers such as font embedding, flattening, etc. I really see no reason to use this format other than it allows you to set security options on an image file. Photoshop RAW This is NOT the same as digital camera RAW format, which is more of a digital negative. Photoshop RAW is really a bare-bones way of transferring the file between applications and platforms. I’ve never used this format or come across anyone else in the industry that uses it, and as a print designer I can’t see any reason start. PICT File and PICT Resource(.pct) The PICT format was used by older versions of the Mac operating system as the native way of displaying graphics in the OS. PICT images are rarely seen or used anymore. One way they may be used is when trying to pull graphics out of other applications that don’t offer a way to export the graphic to get it into Photoshop for further work. Scitex CT An old format used by early graphics technology in the pre-press industry. It has virtually no use anymore. TIFF (.tif) The TIFF file format has been around for a long time and is widely accepted as a “standard” format. TIFF, which stands for Tagged-Image File Format, can by saved as CMYK, RGB, LAB, Indexed Color, Grayscale and Bitmap mode and can include (as of recently) layers, alpha channels, paths, transparency and metadata – though only the flattened image is used by other applications like InDesign, Quark and Illustrator. TIFF used to be the preferred method of saving image files and is the most widely adopted format by the graphics industry, however with graphics applications accepting native Photoshop formatted files (.psd), TIFF’s days are probably numbered. Not only that, but the newer features such as the ability to save layered TIFFs appear to not work too well with other graphics apps like InDesign and Quark XPress and many print industry RIPs. If you do save your files as TIFF, you should make sure that the LZW Compression box is not ticked when saving to prevent any issues at print time. Photoshop DCS Desktop Color Separations (DCS) format is a version of the standard EPS format, and allows you save color separations of your images which includes spot-color channels. This used to be the only format you could use to place an image with spot color into a standard graphics application such as Quark XPress – but you can now simply save your file as .psd (layered Photoshop file). This format gives you the option of ticking check boxes to save the file as a composite file with a preview or separate files for each color used in the file which are joined later in the printing process. You may run across a few printers or applications that require the use of this format, but I highly doubt it. As you can see, the print industry has pretty much been limited to TIFF and PSD for the last few years, with even TIFF beginning to erode as the wide adoption of .psd compatible apps find there way into users hands. JPEG has a strong hold on the Web design field and as a means for backup of original images for most print designers, but I don’t recommend using it for much more than that. Overall the native Photoshop file format is all you should need for modern day applications and use.

