In an effort to combat SPAM, I came across a disposable e-mail address site. SpamBob offers a free email address that you can use for registering with Web sites that you don’t really want to give out your real address to. While these Web sites offer what appears to be valuable services in the war against spam, I urge you to take caution when using them. Some sites may or may not be a front for spammers to begin with.
Free TV/Movie fonts at TypeNow
TypeNow offers fonts from your favorite TV shows, movies, music bands, video games, brand products and more. Remember, these font designs are **probably** trademarked, and should only be used for personal projects.
Selection options in Photoshop
You have a lot of options in working with your selections in Photoshop. Try holding the Spacebar down before you let go of a selection you are making. It will allow you to re-position your selection. Now, make a selction, go to the Select>Transform Selection menu item. Now hold down the Command key and grab the control points and move them around a bit. Starting to see the convenience of this tip yet?
Selecting burried objects in Adobe InDesign
To select objects hidden behind other objects or simply below a larger object, Command + Click until the object you want is selected. Each click selects the object below the previous top object. When you reach the object you want, you can move the object by dragging it while the mouse button is still held down, or drag it from the object’s center point. This is a handy tip, but I’ve found it easier, and more beneficial to make heavy use of Layers. I put text on one layer, borders on another, photos on yet another… it makes it MUCH easier to change things later if I need to.
Free-up RAM for InDesign
![]() Following up on the previous tip on how to free up RAM in Photoshop, if you work in Adobe InDesign all day like I do, you may notice that it gets very sluggish after a few hours. You’ll be doing yourself a huge favor if you simply quit InDesign every once in a while and re-launch it. InDesign will fly along at full speed once you do. The problem is that InDesign suffers from some sort of “memory leak” and it slowly but surely keeps things stored in RAM that it should have purged by itself. Over time, this leads to a slow down that is especially noticeable when scrolling pages with images, scaling images, etc… Quit and relaunch and the RAM gets set free!
Following up on the previous tip on how to free up RAM in Photoshop, if you work in Adobe InDesign all day like I do, you may notice that it gets very sluggish after a few hours. You’ll be doing yourself a huge favor if you simply quit InDesign every once in a while and re-launch it. InDesign will fly along at full speed once you do. The problem is that InDesign suffers from some sort of “memory leak” and it slowly but surely keeps things stored in RAM that it should have purged by itself. Over time, this leads to a slow down that is especially noticeable when scrolling pages with images, scaling images, etc… Quit and relaunch and the RAM gets set free!
Get beautiful paragraphs with InDesign’s Optical Margin Alignment
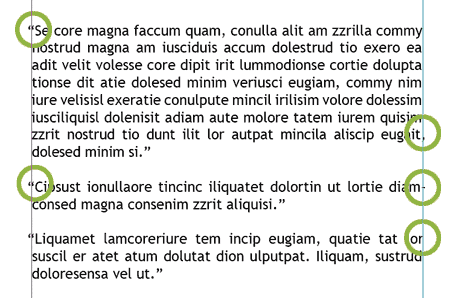
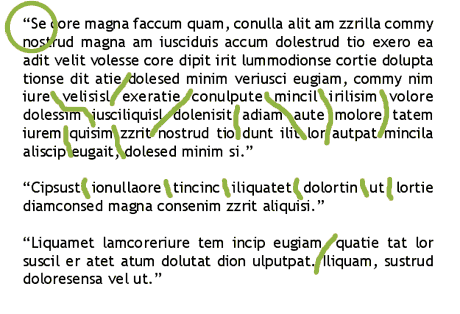
One of the many things designers dread about working with paragraphs of justified type is what we call rivers (gaps inbetween words or letters so large that when it appears on every line in a paragraph it looks like a river going down through your paragraph). Of course you can kern your way through this mess, line by line – and if you use Quark XPress, that’s all you can do. That’s because Quark implements what is called a single-line composer method. This means that Quark looks at one line at a time in a paragraph and decides how to best break the line and adjust the word spacing. Unfortunately, this simply is of little use because if you have to go back and add a word or two, you end up having to re-kern the entire paragraph again. One of the many beauties of Adobe InDesign is the multi-line composer and optical margin alignment features. The multi-line composer feature in Adobe InDesign looks at an entire paragraph of justified text, rather than one line at a time, and decides how to best break each line. For instance, if you add a word or two in the middle of the last sentance of a paragraph, Quark would only kern that last sentance or line, while InDesign looks at the entire paragraph and may even make new line breaks in the first few lines of the paragraph if necessary – which gives you a wonderful, relatively river-free paragraph of text. Then when you turn on Optical Margin Alignment in the Story palette, you are treated to automatic letter and punctuation hanging. This means that letters and punctuation which fall at the first or last character one each line are adjusted so that they hang outside of the text box. In the example below, you can see where the punctuation and the “r” hang over the text box just a little bit, visually making the text look truly “blocked” or justified. Notice also that there are no “rivers” in the paragraphs.  Now lets look at Quark’s composition. I took the same exact paragraph, same font & type size and the same text box width and placed it in Quark, and the results are quite different. In the graphic below, you not only see that punctuation and letters aren’t hanging (which gives the first line of each paragraph a sudo-indent appearance that looks like hell), but the line breaks aren’t that great and the kerning is horrid, creating “rivers” all over the place.
  While margin alignment and multi-line composing won’t do much for you when working with headlines and single lines of text in ads, it can make all the difference in the world when working with newsletters, magazine editorial, brochures and ads that do contain a paragraph of text or two. To turn on Optical Margin Alignment for every InDesign document you create, close all files and open the Story Palette found under the Type menu and click the Optical Margin Alignment check box. Clicking the check box with a document open will only turn it on for that document.
Free-up more RAM for Photoshop
![]() Every once in a while, when you’re working on a large file in Photoshop, you might want to make a trip to Edit>Purge>All – which will free up a LOT of memory. Photoshop stores your history and the clipboard in memory – which takes up quite a bit of space depending on how you work. You may also wish to experiment with lowering the amount of steps that Photoshop saves in your history palette by making a visit to the preferences. The more steps saved, the more RAM used.
Every once in a while, when you’re working on a large file in Photoshop, you might want to make a trip to Edit>Purge>All – which will free up a LOT of memory. Photoshop stores your history and the clipboard in memory – which takes up quite a bit of space depending on how you work. You may also wish to experiment with lowering the amount of steps that Photoshop saves in your history palette by making a visit to the preferences. The more steps saved, the more RAM used.
Delete Photoshop layers quickly
An annoying fact when designing in Photoshop is that you quickly accumulate a multitude of layers. Even with Photoshop’s advancements in the layers arena, it gets out of hand quickly. The best thing you can do is delete unused layers. A quick way to delete multiple layers in Adobe Photoshop is to Shift+click or Command+Click the layers you don’t want, then click on the Layer Palette Trash icon. Don’t forget that you can save a Layer Comp before you delete the layers, that way you can quickly return them if necessary.

