Prevent color shifting in your Photoshop image by adjusting…
![]() When you’re using Curves, Color Balance, Levels, Hue & Saturation, and other color correcting filters on your Adobe Photoshop image, it’s always best to use an Adjustment Layer (the icon at the bottom of the Layers panel shown at right). Doing so allows you to make further adjustments to your image later on using the Adjustments panel, leaving the original image intact. It also gives you an easy way to adjust only the gray values in your image, thus preventing color shifting.
When you’re using Curves, Color Balance, Levels, Hue & Saturation, and other color correcting filters on your Adobe Photoshop image, it’s always best to use an Adjustment Layer (the icon at the bottom of the Layers panel shown at right). Doing so allows you to make further adjustments to your image later on using the Adjustments panel, leaving the original image intact. It also gives you an easy way to adjust only the gray values in your image, thus preventing color shifting.
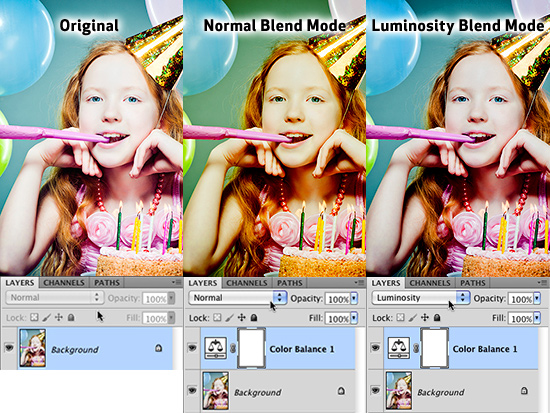
First create an adjustment layer using the color adjustment of your choice. In the example above, I’ve chosen Color Balance. Next use the Blending Mode drop down menu at the top of the Layers panel to set the layer blending mode to Luminosity.
Now when you tweak the settings in your Adjustments panel, Photoshop will limit the changes to only the gray values in your image. As you can see in the image above, leaving the Blending Mode of the Adjustment Layer set to Normal introduces a lot of color shifting in the image. By changing it to Luminosity, Photoshop prevents it from taking place.



3 COMMENTS
You’re welcome! Adjustment layers open up all sorts of options, and this one is just the tip of the iceberg.
Thanks for the interesting article.
This is really cool and useful. Thanks for presenting this here.
Comments are closed.