When you’re working in a document in Adobe InDesign, have you ever found yourself typing a long story in multiple text blocks that are linked, perhaps even across multiple pages, and you realize you want to go back to the beginning of the story to reference something or simply want to re-read what you’ve typed? You can do this easily by hitting Command + A (to select all the text) then hit the Left Arrow key. You can also accomplish the same result by hitting Command + Home. Of course, you can also substitute the End key for the Home key to move the cursor to the end of the text.
Ever notice that when you’re dragging a guide into a Photoshop document that it “snaps” to the edge of an element on the currently active layer? Or when you’re moving a graphical element it “snaps” to the edge of the screen? Or maybe you have the grid feature turned on and you want to temporarily turn the grid snapping off. The easy way to avoid this is to begin dragging your guide or graphical element then press the Control key down. This temporarily disables the “snap” feature of Photoshop.
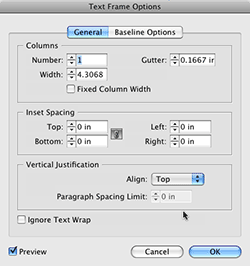
 InDesign’s Text Frame Options dialog box contains a few features/options you may find yourself using often, such as adjusting the column width of your text frame, adding inset spacing, adjusting the frame justification, adjusting your baseline options, and more. A quick way to access them is to hit Command + B with the frame selected. But a quicker way is to Option + Double Click with either of the Selection tools.
When you are editing type in Photoshop, you most likely are quite annoyed by the visible baseline just under the type you are editing. You can get rid of the ugliness by activating (clicking on) the type with the Type Tool, then go to the View Menu and deselect Extras – this will temporarily hide the baseline under the type.
You can copy items from multiple layers at a time in Photoshop by simply adding the Shift key to Command + C or selecting Copy from the Edit menu. Now when you paste, it will give you results as if you had flattened all your layers before making the copy command.
Many times you are stuck with a washed-out photo from digital camera or scanned photo. Most people who try, find that quick adjustments in Photoshop’s Levels or Curves dialogs will certainly boost the colors up, but they also destroy all the details in the photo. Fortunately, Photoshop offers layer modes! Make a duplicate of the photo on another layer, the easiest way is hitting Command + J. Then, set the layer mode of the newly created layer to Overlay. This should really boost the color & contrast, but not mess with your highlights and shadows.
Layer Sets in Photoshop are a great way to organize your layers but many times you will need to merge a set to work on its component layers as a merged, single layer. To do this, activate a layer set, go to the pop-out arrow in the upper right corner of the Layers palette, and drag down to Merge Layer Set. This will replace the set with a merged composite of the set’s component layers. But sometimes I want to get a merged version of a set to work with and maintain the set with its component layers intact. To do this, follow the same sequence above but hold down the Option key before you release over Merge Layer Set. This will merge the set out into a new layer above the existing layer set rather than replacing it.
 Did you know that when you’re using a tool that has a Slider, such as the layer settings in the Layers Palette, after clicking the Slider button you can use the left and right arrow keys to increase or decrease the slider by 1%. You can also hold the Shift key down while pressing the arrow keys to increase or decrease the amount by 10% at a time. This is helpful when the area you’re adjusting is subtle and you want to keep your eye on the image, instead of the slider.


