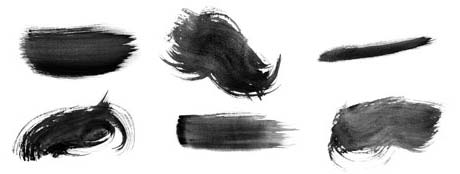
I recently provided a link to some great watercolor brushes for use in Adobe Illustrator. Today, I’ve found another set of brushes, this time for Adobe Photoshop.  SpoonGraphics has graciously provided this excellent super high resolution set of watercolor brushes, absolutely free. And keep an eye on SpoonGraphics, brush set 2 in on the way.
Maybe you saw it and didn’t notice, or maybe you read about it on the Photoshop Disasters blog. Either way, it’s a lesson in Photoshop work. The lesson is “stop and look at what you’re doing.” In their hurry to put together their election cover for Time Magazine, the designer clipped out an election booth and added a fake drop shadow to finish it off. Never mind that the shadow is done poorly, with the cast shadow being a solid shade with hard edges. They should have used a gradient from dark to light, with the lightest part of the shadow being the point furthest away from the object. They should have also added some noise to the shadow to soften it against a white background, and perhaps feathered the edges a bit. The real problem is that when you fake a shadow, it has to actually touch the item it is being cast from where the item meets the floor.

Time Magazine's Photoshop blunder
 When you have a Photoshop document that contains many layers and layer effects, it can sometimes take longer than you want to open. That’s the price you pay for convenience. But there are certain times when you simply want to save the PSD file for use on the Web or for another use that doesn’t require the added file size and convenience of the layers. You could open the file normally, then flatten the image via the Layers panel flyout menu, but that’s too much work. Instead, try this tip. You can open a flattened version of your layered Photoshop file simply by holding down the Option and Shift keys while double clicking the file in the Finder, or opening it from the Open menu in Photoshop. Note: In some rare cases, Photoshop may pop-open a dialog box asking if you wish to use the composite data. Just hit OK and let it open. I’m not sure why it does this, but I’ve found that it usually happens on older Photoshop files.
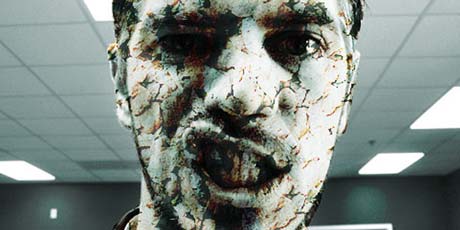
 To cap-off the Halloween posts here at The Graphic Mac, I give you this uber-cool list of 40 Spine-Chilling Horror Photoshop Effects from PSDTuts. While they’re certainly perfect for Halloween as they are, the techniques used to create these effects can surely be used on projects throughout the year – without all that horror and gore thrown in, of course.
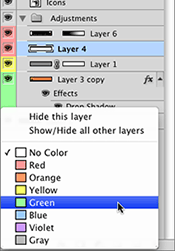
 If you’re like me, you tend to end up with many layers in your Photoshop files. I generally create layer folders to organize them, but sometimes that still isn’t enough, so I turn to color coding the layers. You can color-code layers in the Layers panel by right-clicking (Control + Click) on the layer icon, selecting Layer Properties, clicking the color drop down menu, and finally selecting the color you want before hitting OK. That’s a lot of work to stay organized. Thankfully, there’s a much quicker way. Right-click on the Eye icon of the layer you wish to color code. A flyout menu appears in which you can select the color for the layer. Keeping your layers organized is key in an agency environment where more than one person will work on a file before it is made into a high resolution PDF to send off for printing. Having 37 layers all named “Layer 1, Layer 2, Layer 2 copy” is a real pain when you’re looking for one specific object.
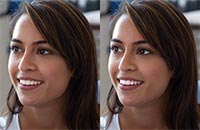
 Whenever the need arises to make a natural element white or whiter (such as in portraits of people), it’s tempting to set the foreground color to white and reach for the brush tool. This works if applied with care, but it’s easier to achieve a more realistic effect using other Photoshop tools. Here, a small amount of whitening applied to the model’s teeth and eyes will lift the whole image. PhotoshopSupport has a quick tutorial on how to whiten the eyes and teeth of your subject in Photoshop.
![]() While I don’t consider it a big deal, I thought I would mention that Adobe has removed a few items from Photoshop CS4 that were found in CS3 and earlier, as well as changed some keyboard shortcuts. Extract, Pattern Maker, Web Photo Gallery, Contact Sheet, Picture Package and PDF Presentation have all been removed from the default installation of Photoshop. The latter four have been replaced by the Output module in Bridge CS4. Several of the CS3 optional plugins have also gone missing, but you can download them here. The plugins include:
While I don’t consider it a big deal, I thought I would mention that Adobe has removed a few items from Photoshop CS4 that were found in CS3 and earlier, as well as changed some keyboard shortcuts. Extract, Pattern Maker, Web Photo Gallery, Contact Sheet, Picture Package and PDF Presentation have all been removed from the default installation of Photoshop. The latter four have been replaced by the Output module in Bridge CS4. Several of the CS3 optional plugins have also gone missing, but you can download them here. The plugins include:
- Alias
- Bigger Tiles
- DisableGetInfoComment
- DisableScratchCompress
- DisableVMBuffering
- ElectricImage
- Force VM Compression
- Force VM Buffering
- HSBHSL
- JPEG2000
- Overscroll Always
- Overscroll Floating Windows
- RememberSlowFiles
- RLA
- SGIRGB
- SoftImage
- Texture Fill
- TWAIN
- Unlimited Clipboard Size
- Unlimited Preview Size
You may also notice that Command + 1 now resets the view to 100%, making it consistent with other Creative Suite tools. You can see a larger list of keyboard shortcut changes at John Nack’s blog. There are very good reasons for the keyboard shortcut changes, but John also provides a link in the article to download a plug-in to switch the commands back on a few of them. That being said, I would avoid using it because it most likely won’t work forever, so you might as well get used to the new commands.
When you’re working with Photoshop brushes such as corner shaped or otherwise directionally oriented, you can easily rotate the brush to fit your needs without manually rotating them with the Transform command.  In the sample image above, I want to use a brush that was meant to be used in the lower right corner. But I want to use it in the upper right corner, so I need to rotate the brush. First, open the Brushes panel by going to Window>Brushes. When the panel pops up, select the brush you wish to use. Next, select Brush Tip Shape from the Brush Presets list on the left side. Finally, click the arrow on the crosshair icon in the lower right and drag it so the arrow points in the direction you wish to have the brush point. You can preview the brush direction change simply by moving your cursor over the canvas area – the brush outline will give you the visual feedback you need.


