You can share your photos on Facebook & Twitter through the app, but it’s an extra step that you may not want to take. Thankfully, there’s a great way to share your Instagram photos with anyone, no iPhone required.
Show off your Instagram images easily with PhotoPile
Turn your image into a beautiful work of art with Snap Art
Alien Skin Software released Snap Art 3 a while back, and I’ve been playing with it for a while now and found it to be yet another excellent Photoshop add-on from my favorite plug-in maker.
Snap Art 3 is definitely made for photographers, but designers can make use of it as well. It’s easy to use, highly flexible, and at $199 it’s affordable for what it does. Not only do the multitude of effects work on photos, but you can apply Snap Art filters to videos imported into Adobe Photoshop Extended as well.
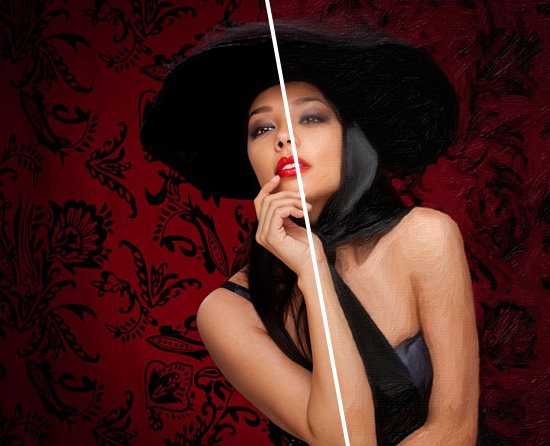
I won’t bother to go into all the filters and features, you can check them out on the Snap Art examples page. But know that Snap Art now offers a Detail Mask feature that allows you to adjust the details in specific areas of your images. Very slick! All of Snap Art’s oil paint, watercolor, pencil, charcoal, comic art, and dozens of other filters, offer non-destructive editing. And experimenting is easy with the large preview window.
Snap Art 3 works with Photoshop CS4 or later, Lightroom 2 or later, and Photoshop Elements 8 or later, on a Mac running OS X 10.5 or newer, including in 64-bit mode. A downloadable demo of Snap Art 3 is available.
How to apply pseudo-HDR image enhancement to your photos
Sometimes even a photo that has been composed perfectly needs a little something to really make it pop. Or maybe you just want to jazz it up for use in a text-heavy document. There’s a simple way to give it a pseudo-HDR effect using Adobe Photoshop, or even Pixelmator.
The original image above is really nice. It’s well-composed, has great depth and color, and would probably be fine as is. To give it some punch, you make a duplicate of the background layer by hitting Command + J, and set the Layer Blending Mode to Overlay using the drop-down menu at the top of the Layers panel.
While the image already shows boosted color and contrast, try duplicating that newly created layer again using Command + J. The Blending Mode should already be set to Overlay, but if it isn’t go ahead and do so. As you can see in the image above, the effect is quite stunning. But if you feel you went too far, adjust the Transparency of the top-most layer until you’re satisfied.
Free image: Rusty warehouse door
I recently posted the above Instagram image (which of course shows up in my personal Facebook feed), and got a few email requests asking if I had a larger version of the image. Rather than offer it over email, I’ve opted to share it here instead. Feel free to use this 2,592 x 1,936 3.4MB JPG image in any manner you see fit.
Alien Skin announces Snap Art 3
Alien Skin Software has announced Snap Art 3, the new version of its artistic natural media plug-in for Adobe Photoshop, Photoshop Elements, and Photoshop Lightroom. Snap Art turns a photo into a beautiful work of art that looks completely handmade. You make the creative choices while Snap Art takes care of all the tedious work of drawing brush strokes.
Snap Art 3 will be available in August 2011 for $199. Owners of Snap Art 1 or 2 may upgrade for $99, and if you buy Snap Art 2 now, you’ll get the upgrade to version 3 for free.
Tips for controlling your DSLR autofocus
Sometimes the autofocus on your DSLR camera can be really annoying. For some shots it’ll focus on the right part of your subject, but then the very next shot it may choose to focus on something far and away into the background.
Steve Berardi from PhotoNaturalist talks about three ways to get better control of autofocus in his guest-post at Digital Photography School.
Lo-Fi for Mac brings retro camera effects to your images
Lo-Fi brings retro camera effects to your digital photos in a fun and user-friendly application that looks more like the back of a digital camera than it does a desktop application. Lo-Fi doesn’t really do anything that you couldn’t do with a copy of Photoshop and some spare time – except that it does them with the click of a button, at a fraction of the cost, and with fantastic results!
After launching Lo-Fi, you simply drag a photo into the large viewer window to get started. That’s when the fun starts. On the right side, you’ll find three rows of options to enhance your photos; Film, Mood, and Frame.